> ## Documentation Index
> Fetch the complete documentation index at: https://sdk.observability.getonex.ai/llms.txt
> Use this file to discover all available pages before exploring further.
# Installation
Install the OneX Governance client to connect **Cursor**, **Claude Code**, and **VS Code Copilot** to your tenant. Installation is done through the **Install OneX Governance** graphical installer on **Windows** and **macOS** only.
## Requirements
| Item | Purpose |
| ---------------------------------- | ----------------------------------------------------------------------------- |
| Installer package | Platform bundle from your organization ([Overview](overview#client-packages)) |
| API URL | OneX API base URL: `http://10.243.138.252/api` |
| Personal token or forwarder secret | Authenticates the client to your tenant (≥ 16 characters) |
| Tenant ID | Identifies your organization in OneX (for example `fpt`) |
**Credentials**: Create a **Personal token** under **Profile → Personal Token** in the [OneX dashboard](https://dashboard.observability.getonex.ai). Your operator may instead provide a shared **forwarder secret** for legacy deployments. Copy the full value when it is shown; you cannot retrieve it later.
Install as the **logged-in user** on your workstation. **Do not run the installer as Administrator** (Windows) or with `sudo` (macOS). Hooks, spool files, and IDE configuration are written to your user profile.
The installer registers **Cursor**, **Claude Code**, and **VS Code Copilot** capture in one step. No additional configuration is required in the GUI.
## What to expect
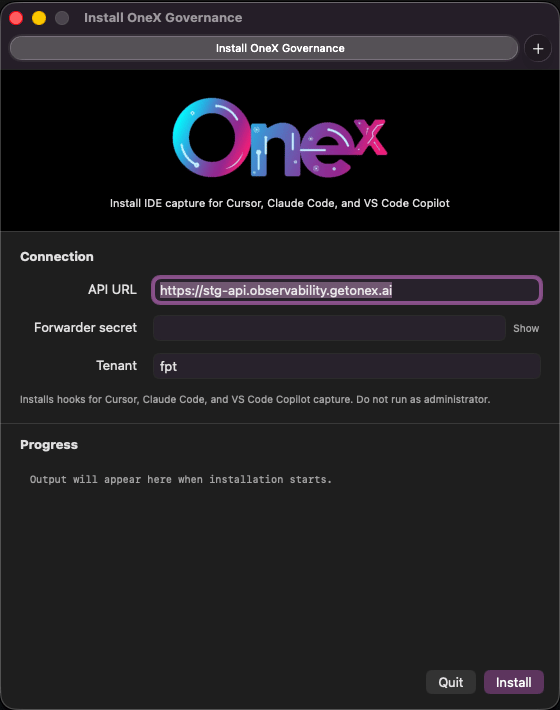
The installer opens a single window titled **Install OneX Governance**. Enter your connection details, click **Install**, and watch the **Progress** log for status.
 | Field | What to enter |
| ----------------------------------------- | --------------------------------------------------------------------------------------------------------------------------------------- |
| **API URL** | `http://10.243.138.252/api`. Must be reachable from your workstation. |
| **Forwarder secret** / **Personal token** | The full token or secret from your operator or dashboard (minimum 16 characters). Use **Show** to verify you pasted the complete value. |
| **Tenant** | Your organization's tenant slug, for example `fpt`. |
The subtitle confirms scope: *Install IDE capture for Cursor, Claude Code, and VS Code Copilot.*
When installation succeeds, the footer shows **Installed successfully** and the **Progress** log lists next steps (restart Cursor, Claude Code, and VS Code). Fully quit each application before reopening. A window reload is not sufficient.
## Windows
1. Unzip **`OneXGovernance-Windows.zip`** to a local folder (for example `Downloads\OneX Governance`).
2. Double-click **`Install OneX Governance.exe`**.
3. Enter **API URL** (`http://10.243.138.252/api`), **Personal token** (or forwarder secret), and **Tenant**, then click **Install**.
4. Wait for **Installed successfully** in the footer and review the **Progress** log.
5. Fully quit and reopen **Cursor**, **Claude Code**, and **Visual Studio Code**.
Do not right-click the installer and choose **Run as administrator**. Running as Administrator installs hooks to the wrong user profile and capture will not work.
## macOS
1. Open **`OneXGovernance-macOS-.dmg`** from your organization (`arm64` for Apple Silicon, `x86_64` for Intel).
2. Double-click **`Install OneX Governance.app`**.
3. Enter **API URL** (`http://10.243.138.252/api`), **Personal token**, and **Tenant**, then click **Install**.
4. Wait for **Installed successfully** and review the **Progress** log.
5. Fully quit and reopen **Cursor**, **Claude Code**, and **Visual Studio Code**.
If macOS blocks the app, open **System Settings → Privacy & Security** and click **Open Anyway** for the installer. Do not use `sudo`.
## After installation
1. Confirm the installer reported **Installed successfully**.
2. Fully restart the IDEs you use.
3. Exercise your assistant (Agent mode, Copilot chat, or Claude Code).
4. Confirm events appear in the governance dashboard.
**GitHub Copilot in VS Code**: The installer configures the OneX VS Code extension, Copilot proxy, and capture settings automatically. No separate Copilot setup is required. The first time you open VS Code after installation, it may restart once while the extension applies its settings. This is normal.
## Updating credentials or reinstalling
To rotate your personal token or fix a broken install, run **Install OneX Governance** again with the updated values. The installer overwrites hooks and client configuration in your user profile.
## Post-install validation
Use your assistant in a normal workflow and check the governance dashboard for new events. If the dashboard stays empty after a full IDE restart, review [Troubleshooting](troubleshooting).
| Field | What to enter |
| ----------------------------------------- | --------------------------------------------------------------------------------------------------------------------------------------- |
| **API URL** | `http://10.243.138.252/api`. Must be reachable from your workstation. |
| **Forwarder secret** / **Personal token** | The full token or secret from your operator or dashboard (minimum 16 characters). Use **Show** to verify you pasted the complete value. |
| **Tenant** | Your organization's tenant slug, for example `fpt`. |
The subtitle confirms scope: *Install IDE capture for Cursor, Claude Code, and VS Code Copilot.*
When installation succeeds, the footer shows **Installed successfully** and the **Progress** log lists next steps (restart Cursor, Claude Code, and VS Code). Fully quit each application before reopening. A window reload is not sufficient.
## Windows
1. Unzip **`OneXGovernance-Windows.zip`** to a local folder (for example `Downloads\OneX Governance`).
2. Double-click **`Install OneX Governance.exe`**.
3. Enter **API URL** (`http://10.243.138.252/api`), **Personal token** (or forwarder secret), and **Tenant**, then click **Install**.
4. Wait for **Installed successfully** in the footer and review the **Progress** log.
5. Fully quit and reopen **Cursor**, **Claude Code**, and **Visual Studio Code**.
Do not right-click the installer and choose **Run as administrator**. Running as Administrator installs hooks to the wrong user profile and capture will not work.
## macOS
1. Open **`OneXGovernance-macOS-.dmg`** from your organization (`arm64` for Apple Silicon, `x86_64` for Intel).
2. Double-click **`Install OneX Governance.app`**.
3. Enter **API URL** (`http://10.243.138.252/api`), **Personal token**, and **Tenant**, then click **Install**.
4. Wait for **Installed successfully** and review the **Progress** log.
5. Fully quit and reopen **Cursor**, **Claude Code**, and **Visual Studio Code**.
If macOS blocks the app, open **System Settings → Privacy & Security** and click **Open Anyway** for the installer. Do not use `sudo`.
## After installation
1. Confirm the installer reported **Installed successfully**.
2. Fully restart the IDEs you use.
3. Exercise your assistant (Agent mode, Copilot chat, or Claude Code).
4. Confirm events appear in the governance dashboard.
**GitHub Copilot in VS Code**: The installer configures the OneX VS Code extension, Copilot proxy, and capture settings automatically. No separate Copilot setup is required. The first time you open VS Code after installation, it may restart once while the extension applies its settings. This is normal.
## Updating credentials or reinstalling
To rotate your personal token or fix a broken install, run **Install OneX Governance** again with the updated values. The installer overwrites hooks and client configuration in your user profile.
## Post-install validation
Use your assistant in a normal workflow and check the governance dashboard for new events. If the dashboard stays empty after a full IDE restart, review [Troubleshooting](troubleshooting).